The Night Blade
Ralavaz the Night Blade, a notorious bandit chieftain, has been released from prison. Rumors mark him as having returned to the hideout from which he and his band once operated—a ruined watchtower where a new group of bandits now preys upon the folk of Whitesparrow and the surrounding vale.
When Ralavaz and his younger brother Gardren led the Night Blade bandits, they were well known in the village of Whitesparrow for their dastardly deeds—including a murder for which Ralavaz was never convicted. Gardren and the rest of the Night Blades were killed when Ralavaz was captured and imprisoned. But Sheriff Ruth Willowmane believes that Ralavaz’s return means the Night Blades are back—and that attacks against wagons and travelers around the village will get worse unless the bandit chieftain is stopped for good.
Adventure Summary
This adventure begins when the party is attacked by members of the new Night Blades. After the fight, the characters investigate the scene of battle to learn more about the bandits. Sheriff Willowmane then recruits the characters to hunt down the new Night Blades and bring Ralavaz to justice.
In Whitesparrow, the characters speak to the villagers to learn more of the history of Ralavaz and the Night Blades. They then make their way through a huge expanse of tangleweed to reach the Lonely Torch—the ruined watchtower that once served the Night Blades as a headquarters. But as they explore the ruins of the tower and face off against the new group of bandits dwelling there, the characters discover that Ralavaz has been imprisoned by his brother Gardren, disfigured but still alive. Learning that Ralavaz has changed his ways and is now trying to turn his brother away from a life of evil, the characters must make a choice about who to save, who to kill, and who to bring back to Whitesparrow to face justice.
Monsters: Bandits (6), shambling mound, guards (2), stirges (10), thugs (2), swarm of rats, bandit captain
Notable NPCs
Sheriff Ruth Willowmane: Sheriff of the village of Whitesparrow, Ruth knows that her younger brother, Dronder Willowmane, was slain by Ralavaz eleven years earlier. But a lack of evidence meant that the bandit chieftain never paid the price for the crime.
Gardren the Night Lord: The younger of the brothers who once led the Night Blades, Gardren is thought by most folk to be dead. Ten years ago, the first incarnation of the Night Blades were cornered in a barn near the Lonely Torch watchtower. Angry villagers set the structure ablaze, and only Ralavaz is thought to have made it out alive. Gardren still lives, however, and is secretly leading a new gang of Night Blades when his brother returns.
Disfigured by the fire, Gardren doesn’t lead the gang for treasure or profit. Rather, he wants to see the folk of Whitesparrow destroyed in the name of his dead friends and the injury done to him. Among his many dark hobbies, Gardren has learned how to tame stirges—or at least to prevent them from attacking him. He has a particularly nasty pet stirge he calls Heartspine, who is always with him.
Ralavaz the Night Blade: Ralavaz is the elder of the brothers who led the Night Blades ten years ago, and the only known survivor of the fire that wiped the bandits out. Having saved a noble’s son during a prison riot while awaiting execution, Ralavaz had his sentence commuted, and was recently released after ten years instead of paying with his life for his crimes. He has returned to the ruined tower known as the Lonely Torch, where new members of the Night Blade bandits now dwell. Unknown to most people, Ralavaz has repented his old ways and become a follower of the goddess of light. He wishes to ask his brother’s forgiveness, and to turn Gardren away from murder and banditry.
Secrets and Clues
-
Ten years ago, Ralavaz, Gardren, and the rest of the Night Blades were trapped in a barn near the Lonely Torch. When angry villagers set the barn ablaze, only Ralavaz made it out, with Gardren and the rest of the trapped Night Blades dying in the fire.
-
In former days, many young men and women who could not make a living in Whitesparrow fell to banditry under the flag of the Night Blades.
-
The original Night Blades used the ruined watchtower known as the Lonely Torch for their headquarters. The site is overgrown with an invasive poisonous tangleweed, which covers most of the hills around the tower.
-
A witness claims to have seen Night Blade bandits pissing on their own boots before making their way up to the Lonely Torch.
-
Dousing one’s boots with urine protects against the worst effects of the tangleweed and allows creatures to move through it.
-
When the Night Blades were destroyed, the area around Whitesparrow was relatively free from bandit attacks for many years. Over the past year, a new group of bandits has appeared at the Lonely Torch, slowly building power by recruiting independent bandits to their cause—or slitting their throats.
-
A masked figure called the Night Lord has recently been revealed as the leader of this new group of bandits, making many see the group as a new incarnation of the Night Blades.
-
The Night Lord has been seen with some sort of red bird perched on his shoulder.
-
The Night Lord wears a golden mask, whose edges reveal that the skin of his neck is horribly scarred.
-
A cloud of bats has been seen flying over the Lonely Torch. Witnesses have reported seeing the bats descend on a large elk that wandered too close to the tangleweed, swarming it and leaving only a bloodless, wrinkled husk behind.
-
A few weeks ago, a number of villagers saw someone they swear was Ralavaz the Night Blade returning to the Lonely Torch.
Customizing the Adventure
You can customize this adventure by replacing either Gardren or Ralavaz with NPCs from your campaign, or from the backgrounds of the characters. Gardren, Ralavaz, or both might have some relationship to one or more of the player characters, either by blood or by having crossed paths in the past. It might even be the case that, before his incarceration, Ralavaz had murdered a character’s family member, companion, or friend.
The Night Blades can be customized to represent a particular faction of bandits from your own game world. Add details to the tower and the chambers below it to highlight a previous empire or some other layer of the history of your campaign. Customize the initial story hook by switching out the quest giver to an NPC the characters have worked with in the past. Any NPC who has reason to see the Night Blades (or the equivalent bandit group from your own campaign) as a threat could send the characters in to cut them down.
Start
Light rain falls, and a gloomy mist covers the landscape. A large tree has fallen across the road, crushing a wagon under its great weight. More fallen trees lie at the sides of the road.
Six bandits (Artur, Dobarn, Kirci, Dorra, Rhuda and Tasty Pete) lurk at the sides of the road, hiding near the fallen trees and ready to rob passersby. If the characters approach the wagon, one of the bandits shouts out,
“Your weapons and belongings! Drop them to the ground, and in the name of the Night Blades, we’ll spare your lives!”
If convinced or goaded into speaking, the bandits reveal that they are eager to look good in the eyes of their leader the Night Lord, who waits for their return at the Lonely Torch.
When the battle is over, the characters can approach local villagers in Whitesparrow to learn some of the information regarding the Night Blades given in the “Secrets and Clues” section. Eventually, the party is approached by Sheriff Willowmane, who hires the characters to root out the Night Blades and bring their newly returned leader Ralavaz to justice.
Customizing the Bandits
This adventure includes battles against a lot of bandits. To keep things fresh, we’ve included a few names for these bandits. Feel free to customize those foes by changing their appearance, gender, or weapons, and to substitute names of your own. Consider tying some of these bandits to NPCs the characters might know or have met. Describe some as being small and fast and others as large and strong. Do what you can to make each bandit unique and interesting.
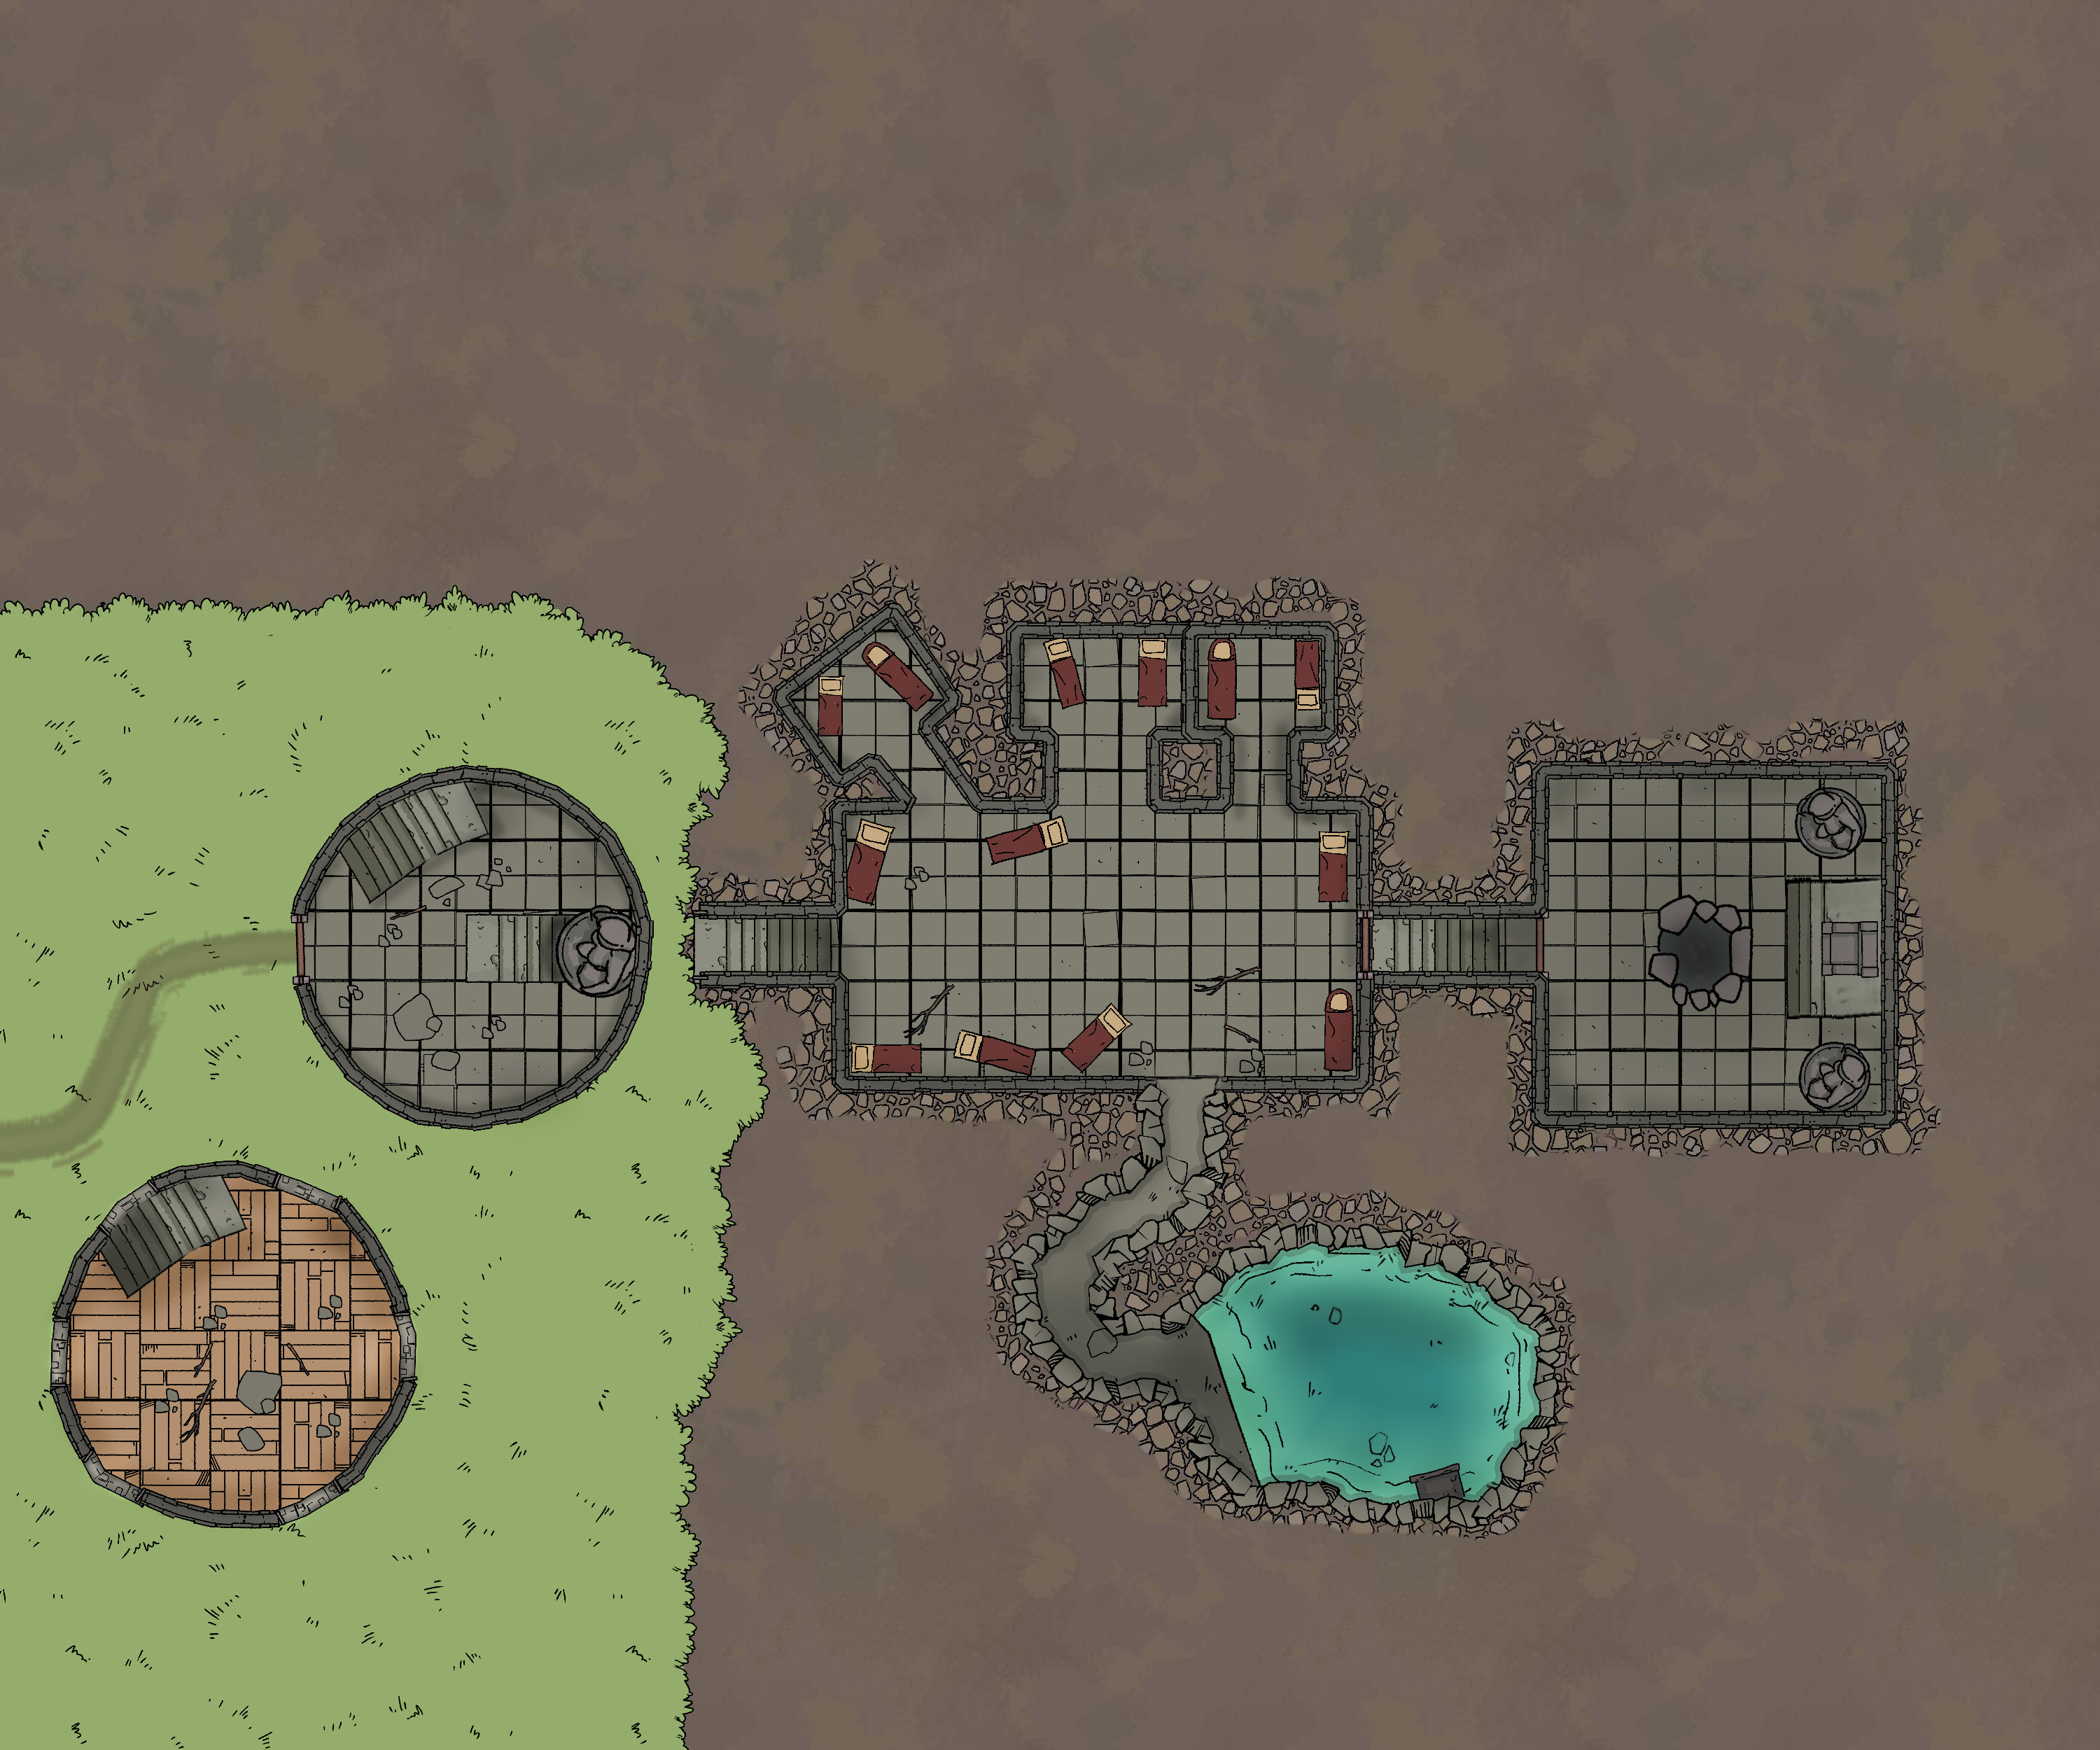
Night Blade Map by Chris Wilson released under a CC0 License and available for Commercial Use.
Notable Locations
The Tangles
Area Aspects: Poisonous tangleweed, sinkholes, statues of ancient lords
A narrow path leads up a rocky slope to the broken stone walls of the Lonely Torch watchtower. A two-foot-thick carpet of glistening green-and-violet weeds and thorny brambles surrounds the stony hill on which the tower sits. Statues of forgotten nobility peer out from the tangled vines.
Tangleweed is an invasive, poisonous plant that can lash out against creatures passing close by. Any creature that moves through the tangleweed without protection must succeed on a DC 13 Constitution saving throw or take 7 (2d6) poison damage and be poisoned for 1 hour. A character with a medical background can spend 10 minutes to aid the victim and attempt a DC 12 Wisdom (Medicine) check. On a success, the afflicted character is no longer poisoned. Covering one’s boots in urine repels the tangleweed and negates the need for a saving throw.
A shambling mound (known as Strangleberries by the Night Blades) might be seen wandering through the tangleweed, but this creature is generally not aggressive. Like the tangleweed, it can be repelled by urine.
Shattered Door
Area Aspects: Ironbound wooden door, grinning gargoyle, narrow arrow slits
The thin path rising through the tangleweed leads up to an ironbound wooden door at the front of the ruined tower. A stone gargoyle juts out from above the door, its mouth open to reveal that its tongue has been broken off. Arrow slits are cut into the rough stone walls of the tower, angled toward the path where it leads up to the door.
Two Night Blade guards (Osgood and Pulk) are meant to watch over this door by peering out the arrow slits from inside the tower. However, they are often either too drunk or too engaged in a game of knucklebones to notice anyone who doesn’t make a lot of noise while approaching. The door is strong ironbound oak and is barred from the inside. The magic that once animated the door’s gargoyle guardian has faded, but the residual spark of that magic allows the gargoyle to speak. The gargoyle is lonely for company, and aware of much of the activity undertaken by those inside
the tower. The bandits have long since ignored the chatty guardian.
Broken Hall
Area Aspects: Collapsed beams, broken floor, headless statue of warrior
Large oaken beams have collapsed from where they once supported the vaulted ceiling of this hall. One has smashed through the floor, revealing basement passages below. A large headless statue of a warrior, its greatsword clasped hilt-up in its hands, stands at the far side of the hall. A stone staircase leads up to the higher floors of the tower.
In addition to the guards described above, four Night Blade bandits (Sanda Sixtoes, Polard the Mule, Julette, and Longtooth) sometimes reside in this hall when preparing for an imminent attack, or when they need to get out of the stagnant air in the basement levels. They avoid the stirges above, which they call “the Night Lord’s children.” While in this hall, the characters might hear commotion from below but they hear nothing but silence from above.
Shadowed Reaches
Area Aspects: Hanging curtains of moss, collapsed walls, painted ceiling
Sections of the walls of this upper level of the tower have collapsed from centuries of decay. Much of the stone ceiling has likewise fallen, leaving the tower open to the elements above. An old yet still beautiful fresco painting covers what remains of the ceiling, but much of it is shrouded by curtains of moss.
Ten stirges lurk behind the cover of the moss, hoping that living creatures will come close enough to feed their insatiable appetites. The Night Blades know to stay out of this chamber, since only Gardren is safe from attack by these monsters.
Sunken Cellars
Area Aspects: Crumbling stone ceiling, wooden beam supports, ragged bedrolls and hammocks
The floor of the tower has collapsed, revealing stairs leading to a series of stone chambers below. Cracked wooden support beams hold up the crumbling stone ceiling of the main chamber, whose walls are lined with hammocks and bedrolls. A stone door, carved with an artful depiction of hooded priests, stands at the opposite end of the hall, while a natural tunnel leads off to the right.
Depending on the time of day, four Night Blade bandits (Terra, Duke, Ashe Dragonknuckle, and Two-Cups) and two thugs (Victor and Kingsteeth) might be sleeping here. They are generally not alert unless a significant amount of noise has been made upstairs. The carved doorway leads into the lost shrine, while the natural tunnel leads to the mud pit.
Mud Pit
Area Aspects: Slick mud walls, mud pool floor, drainpipe, knotted rope
A narrow walkway leads to the lip of a ten-foot-deep pit filled with mud. An ancient drainpipe roughly two feet in diameter is closed off by steel bars and trickles fetid water into the pool. A knotted rope hangs from an iron hook hammered into the natural stone wall.
Two Night Blade bandits (Pelpe and Klive Yellowriver) guard this cavern while Ralavaz languishes in the mud, imprisoned and tormented here by his brother Gardren until he comes to his senses and demonstrates a willingness to return to his former life as a bandit and murderer. One of the bandits has a large bag filled with a swarm of rats, which he uses to torment Ralavaz. If attacked, the bandit dumps out this bag to add to the chaos.
If Ralavaz is rescued, he reveals that he returned to the Lonely Torch after finding out that his brother Gardren was alive and leading a new group of Night Blades. Ralavaz had hoped to turn Gardren away from murder and banditry, but his failure to do so saw him incarcerated here.
Lost Throne
Area Aspects: Kneeling armored statues, stone throne on dais, burning stone braziers, wide well leading down into shadow
Two hulking statues of faceless armored knights kneel in the corners of the room, facing the center of the chamber and a well there that leads down into the shadowy depths. A stone throne sits upon a raised dais opposite the door.
Gardren, a bandit captain, and four Night Blade bandits (Avrin, Ragia, Thorn, and Sasha) are usually found in this hall, sorting through recently stolen goods or planning their next attacks. Gardren’s pet stirge Heartspine hides in the corner and attacks any character who attacks its master. This stirge has 10 hit points and a Dexterity (Stealth) modifier of +5.
Gardren wields a +1 shortsword called Nightculler—a silvered weapon with a draconic pommel and a line of black onyx along the fuller of the blade. A character attuned to the sword is able to cast the darkness spell, requiring no components. Once this feature is used, it can’t be used again until the next dawn.
Concluding the Adventure
This adventure concludes when the characters have removed Gardren and decided what to do with Ralavaz. Still wracked by guilt over his previous life and feeling responsible for the behavior of his brother, Ralavaz is willing to accept whatever punishment the characters or the folk of Whitesparrow seek for him.
Expanding the Adventure
The tower can have numerous hidden chambers beneath its upper levels, accessed by way of the hole in the throne room and expanding in multiple directions beneath the rocky hill. You can also replace the tower with the “Dark Abbey” location from Sly Flourish’s Fantastic Locations, dropping in many additional areas for the characters to explore.
It’s also possible that the story of Ralavaz and Gardren doesn’t end with this adventure. Depending on how Ralavaz wants to make amends for his past crimes, he might have his own quests that he hopes to have the characters follow.